Building a Web Services SmartApp - Part 2
In Part 1 of this tutorial, you learned how to create a simple Web Services SmartApp, and install it in the IDE simulator, and make web requests to it.
In Part 2, we’ll build a simple web application that will integrate with SmartThings and the WebServices SmartApp we created in Part 1.
In Part 2 of this tutorial, you will learn:
- How to get the API token.
- How to discover the endpoints of a Web Services SmartApp.
- How to make calls to the Web Services SmartApp.
Overview
In Part 2 of this tutorial, we will build a simple Sinatra application that will make calls to the Web Services SmartApp we built in Part 1.
If you’re not familiar with Sinatra, you are encouraged to try it out. It’s not strictly necessary, however, as our application will simply make web requests to get the API token and the endpoint.
If you just want to see the manual steps to make requests to get the access token, discover endpoints, and start making calls, you can see the Appendix - Just the URLs, Please.
Note
If Node is more your speed, check out the awesome SmartThings OAuth Node app written by community member John S (@schettj) here. It shows how you can get an access token using the OAuth flow for a WebServices SmartApp using Node.
Prerequisites
Aside from completing Part 1 of this tutorial, you should have Ruby and Sinatra installed.
Visit the Ruby website to install Ruby, and the Sinatra Getting Started Page for information about installing Sinatra.
Bootstrap the Sinatra App
Create a new directory for the Sinatra app, and change directories to it:
mkdir web-app-tutorial
cd web-app-tutorial
In your favorite text editor*, create a new file called server.rb and paste the following into it, and save it.
*(If your favorite text editor is vim or emacs, then our hat’s off to you. We’re impressed - maybe even a bit intimidated. If your favorite editor is notepad, well... we’re not as impressed, or intimidated. :@))
require 'bundler/setup'
require 'sinatra'
require 'oauth2'
require 'json'
require "net/http"
require "uri"

# Our client ID and secret, used to get the access token
CLIENT_ID = ENV['ST_CLIENT_ID']
CLIENT_SECRET = ENV['ST_CLIENT_SECRET']

# We'll store the access token in the session
use Rack::Session::Pool, :cookie_only => false

# This is the URI that will be called with our access
# code after we authenticate with our SmartThings account
redirect_uri = 'http://localhost:4567/oauth/callback'

# This is the URI we will use to get the endpoints once we've received our token
endpoints_uri = 'https://graph.api.smartthings.com/api/smartapps/endpoints'

options = {
  site: 'https://graph.api.smartthings.com',
  authorize_url: '/oauth/authorize',
  token_url: '/oauth/token'
}

# use the OAuth2 module to handle OAuth flow
client = OAuth2::Client.new(CLIENT_ID, CLIENT_SECRET, options)

# helper method to know if we have an access token
def authenticated?
  session[:access_token]
end

# handle requests to the application root
get '/' do
  %(<a href="/authorize">Connect with SmartThings</a>)
end

# handle requests to /authorize URL
get '/authorize' do
    'Not Implemented!'
end

# hanlde requests to /oauth/callback URL. We
# will tell SmartThings to call this URL with our
# authorization code once we've authenticated.
get '/oauth/callback' do
    'Not Implemented!'
end

# handle requests to the /getSwitch URL. This is where
# we will make requests to get information about the configured
# switch.
get '/getswitch' do
    'Not Implemented!'
end
Create your Gemfile - open a new file in your editor, paste the contents below in, and save it as Gemfile.
source 'https://rubygems.org'

gem 'sinatra'
gem 'oauth2'
gem 'json'
We’ll use bundler to install our app. If you don’t have it, you can learn how to get started here.
Back at the command line, run bundle:
bundle install
You’ll also want to set environment variables for your ST_CLIENT_ID and ST_CLIENT_SECRET.
Now, run the app on your local machine:
ruby server.rb
Visit http://localhost:4567. You should see a pretty boring web page with a link to “Connect with SmartThings”.
We’re using the OAuth2 module to handle the OAuth2 flow. We create a new Client, using the client_id and api_key. We also configure it with the options data structure that defines the information about the SmartThings OAuth endpoint.
We’ve handled the root URL to simply display a link that points to the /authorize URL of our server. We’ll fill that in next.
Get an Authorization Code
When the user clicks on the “Connect with SmartThings” link, we need to get our OAuth authorization code.
To do this, the user will need to authenticate with SmartThings, and authorize the devices this application can work with. Once that has been done, The user will be directed back to a specified redirect_url, with the OAuth authorization code. This will be used (along with the Client ID and secret), to get the access token.
Note
By authorizing the application to work with SmartThings, the SmartApp will be installed into the user’s account.
Replace the /authorize route with the following:
get '/authorize' do
  # Use the OAuth2 module to get the authorize URL.
  # After we authenticate with SmartThings, we will be redirected to the
  # redirect_uri, including our access code used to get the token
  url = client.auth_code.authorize_url(redirect_uri: redirect_uri, scope: 'app')
  redirect url
end
Kill the server if it’s running (CTRL+C), and start it up again using ruby server.rb.
Visit http://localhost:4567 again, and click the “Connect with SmartThings” link.
This should prompt you to authenticate with your SmartThings account (if you are not already logged in), and bring you to a page where you must authorize this application. It should look something like this:
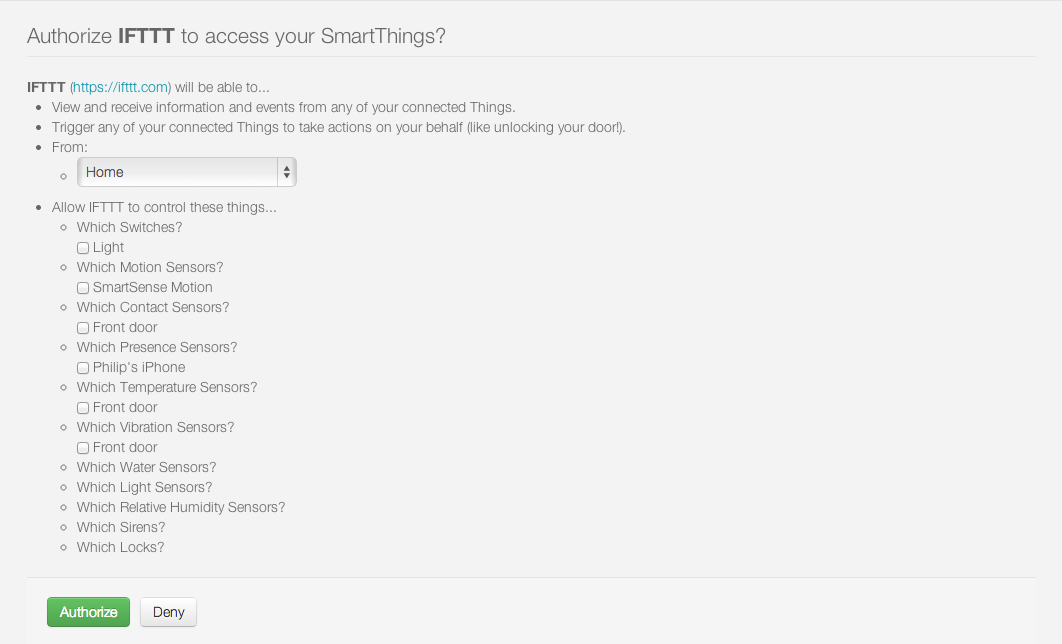
Click the Authorize button, and you will be redirected back your server.
You’ll notice that we haven’t implemented handling this URL yet, so we see “Not Implemented!”.
Get an Access Token
When SmartThings redirects back to our application after authorizing, it passes a code parameter on the URL. This is the code that we will use to get the API token we need to make requests to our Web Servcies SmartApp.
We’ll store the access token in the session. Towards the top of server.rb, we configure our app to use the session, and add a helper method to know if the user has authenticated:
# We'll store the access token in the session
use Rack::Session::Pool, :cookie_only => false

def authenticated?
    session[:access_token]
end
Replace the /oauth/callback route with the following:
get '/oauth/callback' do
  # The callback is called with a "code" URL parameter
  # This is the code we can use to get our access token
  code = params[:code]

  # Use the code to get the token.
  response = client.auth_code.get_token(code, redirect_uri: redirect_uri, scope: 'app')

  # now that we have the access token, we will store it in the session
  session[:access_token] = response.token

  # debug - inspect the running console for the
  # expires in (seconds from now), and the expires at (in epoch time)
  puts 'TOKEN EXPIRES IN ' + response.expires_in.to_s
  puts 'TOKEN EXPIRES AT ' + response.expires_at.to_s
  redirect '/getswitch'
end
We first retrieve the access code from the parameters. We use this to get the token using the OAuth2 module, and store it in the session.
Note
Requesting the token returns JSON which contains information about the token type and the token expiration, in addition to the token itself. The raw response looks something like this:
{
  "access_token": "43373fd2871641379ce8b35a9165e803",
  "expires_in": 1576799999,
  "token_type": "bearer"
}
The expires_in response is the time, in seconds from now, that this token will expire. The time for the token to expire is approximately 50 years from token grant; a refresh token is not sent, but the original token has a very long expiration date.
We then redirect to the /getswitch URL of our server. This is where we will retrieve the endpoint to call, and get the status of the configured switch.
Restart your server, and try it out. Once authorized, you should be redirected to the /getswitch URL. We’ll start implementing that next.
Discover the Endpoint
Now that we have the OAuth token, we can use it to discover the endpoint of our WebServices SmartApp.
Replace the /getswitch route with the following:
get '/getswitch' do
  # If we get to this URL without having gotten the access token
  # redirect back to root to go through authorization
  if !authenticated?
    redirect '/'
  end

  token = session[:access_token]

  # make a request to the SmartThins endpoint URI, using the token,
  # to get our endpoints
  url = URI.parse(endpoints_uri)
  req = Net::HTTP::Get.new(url.request_uri)

  # we set a HTTP header of "Authorization: Bearer <API Token>"
  req['Authorization'] = 'Bearer ' + token

  http = Net::HTTP.new(url.host, url.port)
  http.use_ssl = (url.scheme == "https")

  response = http.request(req)
  json = JSON.parse(response.body)

  # debug statement
  puts json

  # get the endpoint from the JSON:
  endpoint = json[0]['url']

  '<h3>JSON Response</h3><br/>' + JSON.pretty_generate(json) + '<h3>Endpoint</h3><br/>' + endpoint
end
The above code simply makes a GET request to the SmartThings API endpoints service at https://graph.api.smartthings.com/api/smartapps/endpoints, setting the "Authorization" HTTP header with the API token.
The response is JSON that contains (among other things), the endpoint of our SmartApp. For this step, we just display the JSON response and endpoint in the page.
By now, you know the drill. Restart your server, refresh the page, and click the link (you’ll have to reauthorize). You should then see the JSON response and endpoint displayed on your page.
Make API Calls
Now that we have our token and endpoint, we can (gasp!) make API calls to our SmartApp!
As you may have guessed by the URL path, we’re just going to display the name of the switch, and it’s current status (on or off).
Remove the line at the end of the getswitch route handler that outputs the response HTML, and add the following:
# now we can build a URL to our WebServices SmartApp
# we will make a GET request to get information about the switch
switchUrl = 'https://graph.api.smartthings.com' + endpoint + '/switches?access_token=' + token

# debug
puts "SWITCH ENDPOINT: " + switchUrl

getSwitchURL = URI.parse(switchUrl)
getSwitchReq = Net::HTTP::Get.new(getSwitchURL.request_uri)

getSwitchHttp = Net::HTTP.new(url.host, url.port)
getSwitchHttp.use_ssl = true

switchStatus = getSwitchHttp.request(getSwitchReq)

'<h3>Response Code</h3>' + switchStatus.code + '<br/><h3>Response Headers</h3>' + switchStatus.to_hash.inspect + '<br/><h3>Response Body</h3>' + switchStatus.body
The above code uses the endpoint for our SmartApp to build a URL, and then makes a GET request to the /switches endpoint. It simply displays the the status, headers, and response body returned by our WebServices SmartApp.
Note
Note that we used the access_token URL parameter to specify the API key this time, instead of the "Authorization" HTTP header. This is just to illustrate that you can use both methods of passing the API key.
Restart your server and try it out. You should see status of your configured switches displayed!
Summary
In the second part of this tutorial, we learned how an external application can work with SmartThings by getting an access token, discover endpoints, and make API calls to a WebServices SmartApp.
You are encouraged to explore further with this sample, including making different API calls to turn the configured switch on or off.
Appendix - Just the URLs, Please
If you want to quickly test getting access to a Web Services SmartApp, without creating an external application, you can use your web browser to make requests to get the API token and endpoint. Most of these steps will not be visible to the end user, but can be useful for testing, or just for reference so you can build your own app.
Here are the steps:
Get the OAuth Authorization Code
In your web browser, paste in the following URL, replacing the CLIENT_ID with your OAuth Client ID:
https://graph.api.smartthings.com/oauth/authorize?response_type=code&client_id=CLIENT_ID&scope=app&redirect_uri=https%3A%2F%2Fgraph.api.smartthings.com%2Foauth%2Fcallback
Once authenticated, you will be asked to authorize the external application to access your SmartThings. Select some devices to authorize, and click Authorize.
This will redirect you to a page that doesn’t exist - but that’s ok! The important part is the OAuth authorization code, which is the “code” parameter on the URL. Grab this code, and note it somewhere. We’ll use it to get our API token.
Get the API token
Important
OAuth Changes
Access token requests have changed to require users to pass their OAuth client ID and secret using HTTP Basic Authentication. This is a security-related improvement, and aligns us closer to the OAuth 2.0 Specification (RFC 6749).
For backwards compatibility, we still support sending the Client ID and secret as POST or GET parameters (outside of the browser context for which the authorization was invoked), but this functionality is deprecated and should be updated as discussed below.
Using the code you just received, and our client ID and secret, we can get our access token. This call must be done outside of the browser. The call must include the client ID and secret using HTTP Basic Authentication (we’ll use curl).
Paste the following into a new terminal window, replacing CLIENT_ID, CLIENT_SECRET, and CODE with the appropriate values:
curl -u CLIENT_ID:CLIENT_SECRET 'https://graph.api.smartthings.com/oauth/token?code=CODE&grant_type=authorization_code&redirect_uri=https%3A%2F%2Fgraph.api.smartthings.com%2Foauth%2Fcallback&scope=app'
This should return JSON like the following, from which you can get the access_token:
json {
  "access_token": "43373fd2871641379ce8b35a9165e803",
  "expires_in": 1576799999,
  "token_type": "bearer"
}
Discover the Endpoint URL
You can get the endpoint URL for your SmartApp by making a request to the SmartThings endpoints service, specifying your access token.
In your web browser, paste the following into your address bar, replacing ACCESS_TOKEN with the access token you retrieved above.
https://graph.api.smartthings.com/api/smartapps/endpoints?access_token=ACCESS_TOKEN
That should return JSON that contains information about the OAuth client, as well as the endpoint for the SmartApp:
[
  {
  "oauthClient": {
    "clientId": "myclient",
    "authorizedGrantTypes": "authorization_code"
  },
  "url": "/api/smartapps/installations/8a2aa0cd3df1a718013df1ca2e3f000c"
  }
]
Make API Calls
Now that you have the access token and the endpoint URL, you can make web requests to your SmartApp endpoint using whatever tool you prefer.
Just make sure to preface http://graph.api.smartthings.com to the beginning of the URL returned above, and any endpoints your SmartApp exposes (e.g., /switches) to the end of the URL.
You can either specify your access token via the access_token URL parameter as above, or (preferably) use the Authorization header ("Authorization: Bearer <API TOKEN>").