Building the Service Manager
The Service Manager’s responsibilities are to:
- Authenticate with the 3rd party cloud service
- Device discovery
- Add/Change/Delete device actions
- Handle sending any messages that require the authentication obtained.
We will look at a detailed example of what is outlined above. But first, let’s see an example of how what we are trying to accomplish would look like in the SmartThings application.
Authentication using OAuth
End User Experience
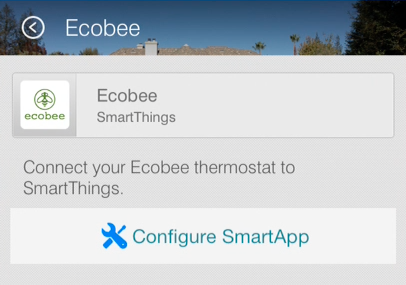
The experience for the end user will be fairly seamless. They will go through the following steps (illustrated using the Ecobee Thermostat)
The user selects the Service Manager application from the SmartApps within the SmartThings app. Upon selection, they are prompted with an initial landing page, describing what the application does and a link to configure.
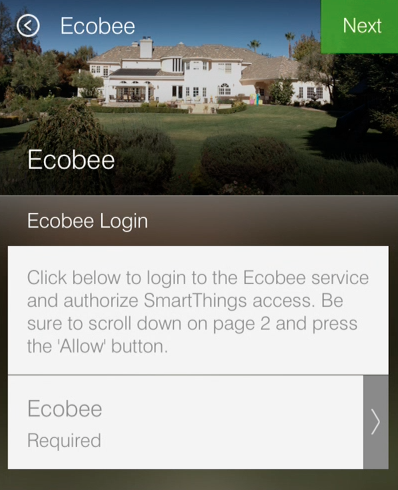
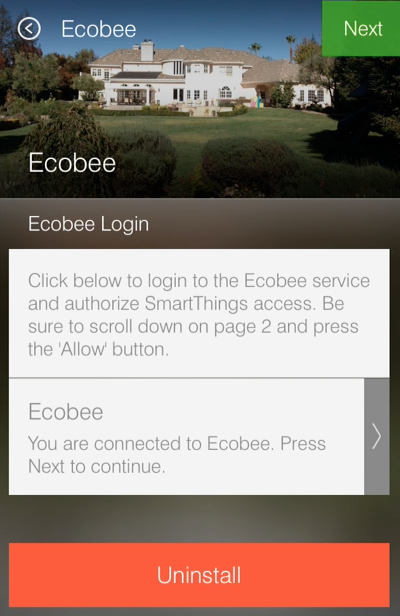
Authorization with the third party is the first part of the configuration process. The user is driven to a page which tells them about the authorization process and how it will work. They can then click a link to move forward.
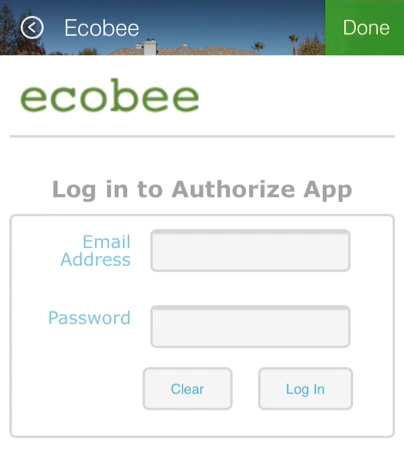
The user will be driven to a third party site, embedded within the SmartThings application chrome. They will be required to put in their username and password for the third party service.
The third party server will show what SmartThings will have access to and give the user the opportunity to accept or decline.
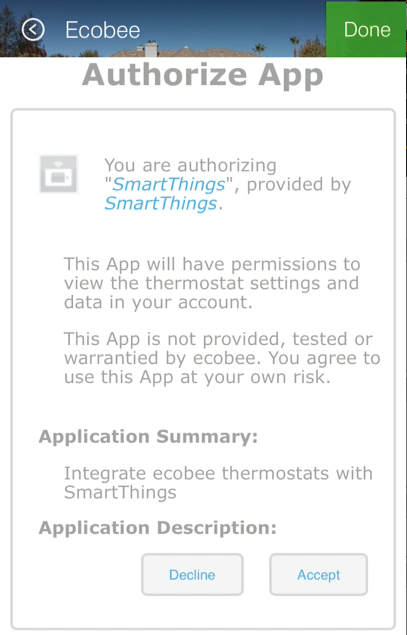
Upon acceptance, the user will be redirected to another page within the third party service. This page includes language about the end user clicking done on the top right of the SmartThings chrome.
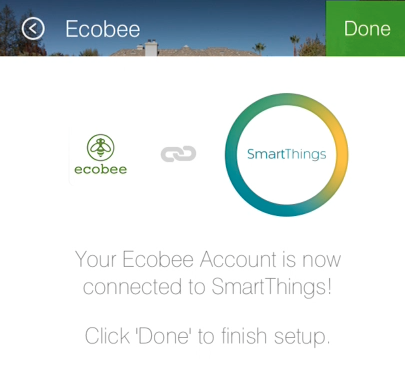
After done is clicked, the user will go back to the initial configuration screen, seeing that their device is now connected. They can then click next to continue, and any other configuration can be done.
Implementation
OAuth is the typical industry standard for authentication. The 3rd party service may use something other than OAuth. In that case, it is up to you to consult their documentation and implement it. The basic concepts will be the same as it is with OAuth. The following example will walk through what is necessary for OAuth authentication.
The overall idea is that you will create a page that will call out to the third party API and then map a URL to a handlerLoads method to be able to handle a response back with an access token.
Within your service manager preferences, you create a page for authorization.
preferences {
    page(name: "Credentials", title: "Sample Authentication", content: "authPage", nextPage: "sampleLoggedInPage", install: false)
    ...
}
and define it within a method below.
def authPage() {
    if(!state.sampleAccessToken)
        createAccessToken()
}
The authPage method simply checks to see if there already is an access token. If not, we call a method to retrieve one.
Lets take a look at the createAccessToken method next.
def createAccessToken() {

    state.oauthInitState = UUID.randomUUID().toString()
    def oauthParams = [
        response_type: "token",
        client_id: "XXXXXXX",
        redirect_uri: "https://graph.api.smartthings.com/api/token/${state.accessToken}/smartapps/installations/${app.id}/receiveToken"
    ]
    def redirectUrl = "https://api.thirdpartysite.com/v1/oauth2/authorize?"+ toQueryString(oauthParams)

    return dynamicPage(name: "Credentials", title: "Sample", nextPage:"sampleLoggedInPage", uninstall: uninstallOption, install:false) {
        section {
            href url:redirectUrl, style:"embedded", required:false, title:"Sample", description:"Click to enter Sample Credentials."
        }
    }
}
First, setup the params for your OAuth request. Then return a new page, created by the redirect URL. Finally, load up the OAuth initialization URL embedded within the app.
Once the user has authenticated through the third-party, they will be sent back to your SmartApp, and their callback needs to be handled properly.
To handle the callback, you can map a URL within your service manager. As specified, the callback will go to the following URL.
mappings {
    path("/receiveToken") {
        action: [
            POST: "receiveToken",
            GET: "receiveToken"
        ]
    }
}
You also need to setup a relevant handler method that will take the access_token passed and save it in the state (which will persist over time). This handler should also indicate to the end user that they need to click the done button to exit the external third party flow and go back to your SmartApp.
def receiveToken() {
    state.sampleAccessToken = params.access_token
    render contentType: 'text/html', data: "<html><body>Saved. Now click 'Done' to finish setup.</body></html>"
}
Refreshing the OAuth Token
OAuth tokens are available for a finite amount of time, so you will often need to account for this, and if needed, refresh your access_token. To do this, you need to store the refresh_token in your state, like so:
def receiveToken() {
    state.sampleAccessToken = params.access_token
    state.sampleRefreshToken = params.refresh_token
    render contentType: 'text/html', data: "<html><body>Saved. Now click 'Done' to finish setup.</body></html>"
}
If you run an API request and your access_token is determined invalid, for example:
if (resp.status == 401 && resp.data.status.code == 14) {
    log.debug "Storing the failed action to try later"
    atomicState.action = "actionCurrentlyExecuting"
    log.debug "Refreshing your auth_token!"
    refreshAuthToken()
}
you can use your refresh_token to get a new access_token. To do this, you just need to post to a specified endpoint and handle the response properly.
private refreshAuthToken() {
    def refreshParams = [
        method: 'POST',
        uri: "https://api.thirdpartysite.com",
        path: "/token",
        query: [grant_type:'refresh_token', code:"${state.sampleRefreshToken}", client_id:XXXXXXX],
    ]
    try{
        def jsonMap
        httpPost(refreshParams) { resp ->
            if(resp.status == 200)
            {
                jsonMap = resp.data
                if (resp.data) {
                    state.sampleRefreshToken = resp?.data?.refresh_token
                    state.sampleAccessToken = resp?.data?.access_token
            }
        }
    }
}
There are some outbound connections in which we are using OAuth to connect to a third party device cloud (Ecobee, Quirky, Jawbone, etc). In these cases it is the third party device cloud that issues an OAuth token to us so that we can call their APIs.
However these same third party device clouds also support webhooks and subscriptions that allow us to receive notifications when something changes in their cloud.
In this case and ONLY in this case the SmartApp (service manager) issues its OWN OAuth token and embeds it in the callback URL as a way to authenticate the post backs from the external cloud.
Discovery
Identifying Devices in the Third-Party Device Cloud
The techniques you will use to identify devices in the third party cloud will vary, because you are interacting with unique third party APIs which all have unique parameters. Typically you will authenticate with the third party API using OAuth. Then call an API specific method. For example, it could be as simple as this:
def deviceListParams = [
    uri: "https://api.thirdpartysite.com",
    path: "/get-devices",
    requestContentType: "application/json",
    query: [token:"XXXX",type:"json" ]

httpGet(deviceListParams) { resp ->
        //Handle the response here
}
Creating Child-Devices
Within a service manager SmartApp, you create child devices for all your respective cloud devices.
settings.devices.each {deviceId->
    def device = state.devices.find{it.id==deviceId}
      if (device) {
        def childDevice = addChildDevice("smartthings", "Device Name", deviceId, null, [name: "Device.${deviceId}", label: device.name, completedSetup: true])
  }
}
Getting Initial Device State
Upon initial discovery of a device, you need to get the state of your device from the third party API. This would be the current status of various attributes of your device. You need to have a method defined in your Service Manager that is responsible for connecting to the API and checking for updates. You set this method to be called from a poll method in your device type, and in this case, it is called immediately on initialization. Here is a very simple example, which doesn’t take into account error checking for the http request.
def pollParams = [
    uri: "https://api.thirdpartysite.com",
    path: "/device",
    requestContentType: "application/json",
    query: [format:"json",body: jsonRequestBody]

httpGet(pollParams) { resp ->
    state.devices = resp.data.devices { collector, stat ->
    def dni = [ app.id, stat.identifier ].join('.')
    def data = [
        attribute1: stat.attributeValue,
        attribute2: stat.attribute2Value
    ]
    collector[dni] = [data:data]
    return collector
    }
}
Handling Adds, Changes, Deletes
Implicit Creation of New Child Devices
When you update your settings in a Service Manager to add additional devices, the Service Manager needs to respond by adding a new device in SmartThings.
updated(){
    initialize()
}

initialize(){
    settings.devices.each {deviceId ->
        try {
            def existingDevice = getChildDevice(deviceId)
            if(!existingDevice) {
                def childDevice = addChildDevice("smartthings", "Device Name", deviceId, null, [name: "Device.${deviceId}", label: device.name, completedSetup: true])
            }
        } catch (e) {
            log.error "Error creating device: ${e}"
        }
    }
}
Implicit Removal of Child Devices
Similarly when you remove devices within your Service Manager, they need to be removed from SmartThings.
def delete = getChildDevices().findAll { !settings.devices.contains(it.deviceNetworkId) }

delete.each {
    deleteChildDevice(it.deviceNetworkId)
}
Also, when a Service Manager SmartApp is uninstalled, you need to remove its child devices.
def uninstalled() {
    removeChildDevices(getChildDevices())
}

private removeChildDevices(delete) {
    delete.each {
        deleteChildDevice(it.deviceNetworkId)
    }
}
Note
The addChildDevice, getChildDevices, and deleteChildDevice methods are a part of the SmartApp API
Changes in Device Name
The device name is stored within the device and you need to monitor if it changes in the third party cloud.
Explicit Delete Actions
When a user manually deletes a device within the Things screen on the client device, you need to delete the child devices from within the Service Manager.